Sunday, March 6, 2011

Create Restore Point In Windows 7

Silly problem can damage your system. Sometimes windows takes too much time to start and hangs on welcome screen. "Please wait..." takes too much times. When windows does not start normally there is a way to repair windows. All you have to do is to create a restore point when windows is running properly. It's very easy to create restore point in windows 7.

STEPS:

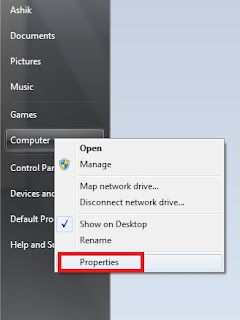
  1. Click on Start menu. Right click on Computer icon and select Properties.
    Computer Properties

    Control Panel of system will open as shown below.
  2. Control Panel All Control Panel Items System
  3. Click on System Protection. System Properties window will open as shown below.
  4. System protection window
  5. Click on the Create.. button. A window will open as shown below. Give a name of the restore point. Click Create.
  6. name the restore point
  7. You will see creating a restore point.
    creating a restore point

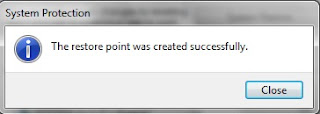
  8. Restore point is created.
  9. restore point created

The system settings are saved for future use. If you are having trouble with the instruction just leave a comment.
Install And Run Slax From Pen drive/ Flash drive

Slax logo leaf

Sometimes our windows crashes and valuable data are lost forever. When we setup new windows all the data in the windows drive needs to move to another location. In this case we need another computer to connect our hard drive. But imagine you can move or copy your data without another PC. All you need is a pen drive and Slax.
Slax is a portable Linux operating system. It's absolutely free and you can customize as you wish.
Here is a simple instruction to open slax from pen drive.


  1. Download the latest version of Slax from slax.org. You can download the iso or TAR file. TAR is a archive like ZIP. Any of the format will work.
  2. You need a USB pen drive which has the capacity of at least 200 MB. Connect the pen drive to your computer.
  3. Format the pen drive in fat file system.
  4. Unpack the archive(ISO or TAR) to your pen drive. Two folder of name boot and slax will be created in the pen drive.
  5. Go to boot folder in the pen drive and run bootinst.bat file.
    bootinst.bat file in pendrive directory

    Slax boot installer
    will open in a window. Press any key to continue the process.
    slax boot installer

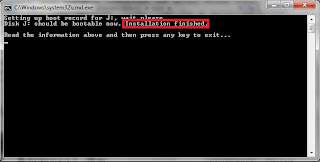
  6. A message will be shown that pen drive is bootable and installation is finished. Press any key.
    pendrive bootable

  7. To run slax from pen drive restart your computer. Press del or F2 to enter BIOS. Change the boot sequence and set first boot priority to usb pen drive.
  8. Restart your Pc. Slax will boot automatically.
    Slax system after startup

If you does not understand the instruction then leave a comment.

Thursday, March 3, 2011

Tour To The Country Side

sunset on open field
Sunset In Open Field
burning sun
Burning Sun Over A Tree


Rice fields almost evening
Crops Field
rail lines over water point
Rail Lines Over A Water Point


Wednesday, March 2, 2011

Hiren Boot CD-Install Your Operating System In Less than 5 Minutes


Hiren's Boot CD is a bootable CD that has some very important software installed. You can download for free and burn it in a blank CD. By booting from the CD you can see the list of software it contains. The most important software that it has is the Acronis True Image. This software can be used for create back up and restore a hole disk drive. That means if you install a new operating system such as windows XP or 7 and then you can create a back up of the disk drive that contains the windows. And whenever you need it can be restored from the back up. It takes 4-5 minutes to copy the whole image. So create a image of your windows drive and setup windows with all the programs installed in just 4-5 minutes.

STEPS:

Create Backup

  1. Download Us Patched Hiren Boot CD 10.1 or any other version that contains Acronis True Image.
  2. Burn the ISO file as a image in a blank CD with a burning software like Nero. So the CD will be bootable.
  3. Change the programs you want to install or remove from your windows. You can install a new windows and install all of your program in it. Or you can go with your current windows.
  4. Insert the Hiren boot CD in the CD ROM and restart.
  5. Make sure the first boot priority is CD ROM drive by entering into BIOS.
  6. Boot from CD. Select option 2 as shown below.
    Fig: Hiren's Boot CD

  7. You will see Hiren Boot CD Menu. Select Disk Clone Tools as shown below.
    Fig: Hiren's Boot CD Menu

  8. Select Acronis True Image 8.1.945.
  9. Most of the parts will happen automatically, if not then look for Auto option.
  10. Acronis True Image will open in a window as shown below.
    Fig: Acronis True Image

  11. Click Backup and Restore. Then select Backup and Next.
  12. Click NTFS. Read the instructions carefully.
  13. Write the file name as you want and show the directory where to save.
  14. Select your windows drive (Most of the case C:\) Create full backup image archive.
  15. Select compression level. The more you compress the lesser space it will take.
  16. You can give password or comments as you wish. 
  17. Click Proceed. Then your backup will be created. 

Restore Backup

If you windows crashes its time to restore the image. Follow the instruction 4 to 10. Click on the Backup and Restore. Select Restore option. Select the backup file you have created earlier and Next. Check the drive in your backup or archive. Select the drive which you want to replace with your backup. Make your replacement MBR (Master Boot Record). If you don't know which option to select just go with the default. Proceed the operation.
If you are facing any trouble with the process then leave a comment. I'll solve it. 

Put Picture Side By Side in Blogger

 When you insert a picture in blogger, you have the option to position it on the left right or center. You can also make the picture small medium or large. If you want to put a pic in small mode and put more picture on the side then you have to make a table with different cell for each picture. Here is the easiest steps to do that.
STEPS:

  1. Open a New Post.
  2. Insert your image.
  3. In the Compose mode click on the picture and make it small, medium or large as you wish.
  4. In the Edit HTML mode you will get individual HTML code for each picture. Each para of the HTML code is for one picture. This is the picture code. Save it for later.
  5. Open another New Post and go to the Edit HTML option. Copy and paste this CODE: <table border="0" width="150"><tbody><tr><td>FIRST CELL</td><td>SECOND CELL</td><td>THIRD CELL</td></tr></tbody></table>
  6. This code is for table with three cell. You can add or reduce the no. of cell by adding or erasing <td>ANOTHER CELL</td> portion of the code.
  7. Replace the FIRST CELL, SECOND CELL and THIRD CELL with the picture codes. This is  whole code is for table and all the picture in the table. Go to Compose mode to check what happened. If you want to add writing then copy the whole code. Create a New Post, write what ever you want. Then go to the Edit HTML and paste the whole picture code where you want the pictures.
     If this post helps you or needs correction then add a comment.